
I found a spherical Lithophane of Jupiter and decided it was time to update my NeoPixel Lamp. This time I want to extend the capabilities of the lamp and make it Internet connected. The end result is a lamp with no buttons that only requires power and a phone app to operate it.

Designing the Electronics
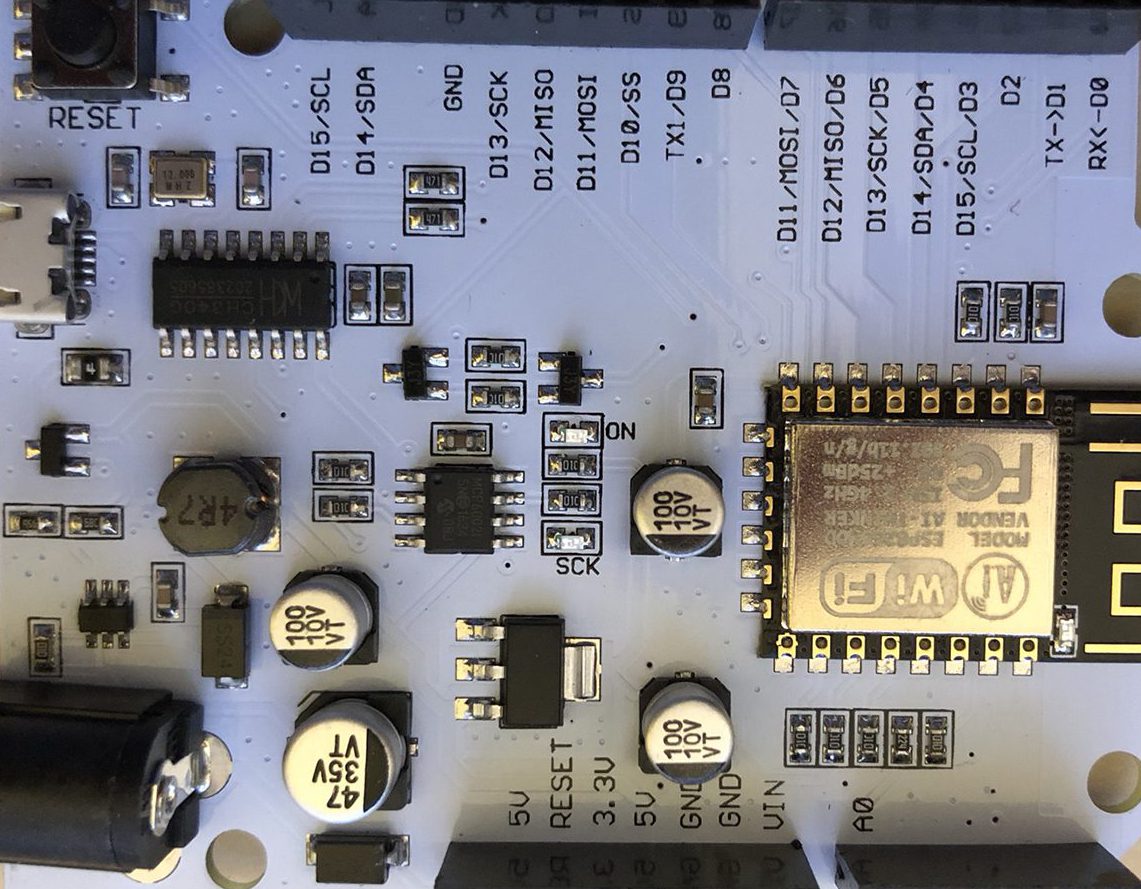
Let’s get to it. The first thing we need is a simple few parts to begin. At a minimum we need a WiFi connected Arduino board, a little power and a collection of LEDs. For the WiFi connected Arduino, I choose the poorly supported but very cheap LinkNode D1 board, a WeMos D1 R1 clone. I happened to have some of these in my stock of parts. I picked up a pack of Power Adapters for Arduinos and purchased a NeoPixel 16 LED RGBW Ring from Adafruit.
Parts List:
Building A Prototype
There are two part to building an Arduino prototype, at least for me. Hack together the wiring in the easiest way possible while avoiding the soldering iron and borrow code from whatever website you can find that even remotely looks like something you can use. Or as I call it, hardware development.
Let’s look at the very simple wiring.

See, not complicated at all. We need a single PWN control pin, which is why I like the NeoPixels, some power and a ground connection. Interestingly enough, on the LinkNode D1 board, the PIN6 connection is actually the D12 connection. I just coded around that and used PIN12 for control. I’d like to say I figured out why, but I would be lying.
Now let’s talk about code borrowing. Lots and lots of Arduino programming can be accomplished simply by having the right libraries and examining the examples with those libraries. This project is not an exception.
To begin the project we need to gather the required libraries. To simplify the phone app programming, I decided to leverage Blynk to quickly create the phone app and create a linkage to the LinkNode D1 board. In addition to the Blynk libraries and iPhone (or Android) application, I also needed the NeoPixel libraries and the esp8266wifi libraries.
The NeoPixel libraries provide the code and examples necessary to drive the LED ring. The esp8266wifi libraries make the development and use of WiFI fairly straightforward.
Library downloads:
If you need help with installing the Arduino libraries, there is a great tutorial over at the Arduino website.
Once you have the libraries installed, we need to install the esp8266wifi board into the Arduino IDE.
To do this, follow these steps.
- Start the Arduino IDE and open the Preferences window
- Enter
http://arduino.esp8266.com/stable/package_esp8266com_index.jsoninto the Additional Board Manager URLs field (You can add multiple URLs, separating them with commas) - Open the Boards Manager from Tools > Board menu and find esp8266 platform
- Select the version you need from a drop-down box (I use the latest)
- Click on the install button
- Select the WeMos D1 R1 board from the Tools > Board menu after installation
Now we need to gather a few pieces of information. We will need the SSID and Password to your WiFi network. I assume you know how to get that information. We also need an authorization token from the Blynk app. To get the Blynk auth token, you need to open up the application on your phone and register for a Blynk account.
Once you are registered, you need to start a new project:

Give your project a name and select the appropriate board, ESP8266, and connection type, WiFi.

When you create the project you will receive your authorization key via email and it is also available in the phone app. I would copy and paste it from the email, but I am old and my eyes don’t work like the used to…
Ok, we have the hardware, wired up the LEDs, installed the libraries, added the Arduino board to our IDE, gathered our WiFI information and received our Blynk authorization code…what is left? Coding…the hard part.
I needed a plan. What did I want my lamp to do. I decided on a simple button that cycles through various displays and colors. I also wanted a slider to set the brightness. So I created two controls in the Blynk phone app.
By sliding over to the right in your project screen, you can select from a list of possible controls. I chose the button and slider adding them to my project one at a time.

Once I have the button and slider on my project board, I stretched them out into a pleasing arrangement. Then I defined their functions.

For the button, I gave it a name and chose Virtual Pin 0. I also changed the label names for the on and off state and set the type to push so that the button was only active when my finger was placed on it.

Setting the virtual pin:

For the slider, it is a similar process. I set the name and made the switch send values only when I released the slider. One other important things to note is that NeoPixels have a brightness range from 0-255. Since we are taking the brightness value from this slider, I set the output to a similar range.

So now we have plan and an interface. It’s time to write the code. Below I have pasted a complete annotated copy that shows how what choices I made and how I blatantly copied most of the examples 🙂 Copy and paste it into your Arduino IDE.
// Serial Monitor Output for Blynk -- Good for troubleshooting
#define BLYNK_PRINT Serial
// Add the NeoPixel LIbrary
#include <Adafruit_NeoPixel.h>
// Add the esp8266wifi libraries
#include <ESP8266WiFi.h>
// Add the Blynk library for the esp8266wifi chip
#include <BlynkSimpleEsp8266.h>

// Set the bounds for out button
#define ON 255
#define OFF 0
// Set up a little on first connection magic
bool isFirstConnect = true;

// You should get Auth Token in the Blynk App.
// Go to the Project Settings (nut icon).
char auth[] = "4ccfc7a6c83e437981a5142bf4fa45eb";

// Your WiFi credentials.
// Set password to "" for open networks.
char ssid[] = "Bill Wi The Science Fi";
char pass[] = "alabama21mississippi22tennessee23";

// NeoPixel Connections, Control PIN, LED Count, Notice I wired it at PIN6 on a normal Arduino, but this board read it at PIN12
#define PIN 12
#define NUM_LEDS 16 // We are using the 16 LED ring, if you went larger, change this

// variable for which effect to display
int showType = 0;
// variable for the slider brightness level
int brightness = 0;

// NeoPixel Setup
// Parameter 1 = number of pixels in strip
// Parameter 2 = Arduino pin number (most are valid)
// Parameter 3 = pixel type flags, add together as needed:
// NEO_KHZ800 800 KHz bitstream (most NeoPixel products w/WS2812 LEDs)
// NEO_KHZ400 400 KHz (classic 'v1' (not v2) FLORA pixels, WS2811 drivers)
// NEO_GRB Pixels are wired for GRB bitstream (most NeoPixel products)
// NEO_RGB Pixels are wired for RGB bitstream (v1 FLORA pixels, not v2)
// NEO_RGBW Pixels are wired for RGBW bitstream (NeoPixel RGBW products)
// Adafruit_NeoPixel strip = Adafruit_NeoPixel(60, PIN, NEO_GRB + NEO_KHZ800);
Adafruit_NeoPixel strip = Adafruit_NeoPixel(NUM_LEDS, PIN, NEO_RGBW + NEO_KHZ800);


void setup() {
 // Open Serial Monitor for Troubleshooting
 Serial.begin(9600);
 // Get Blynk Connected
 Blynk.begin(auth, ssid, pass);
 // Init the NeoPixels and Set to Off
 strip.begin();
 colorWipe(strip.Color(0, 0, 0), 50);
 strip.show();
 // Let everything happen man, life should be enjoyed.
 delay(5000);
}

BLYNK_CONNECTED() // runs every time Blynk connection is established
{
 if (isFirstConnect)
 {
// Request server to re-send latest values for all pins
 Blynk.syncAll();
 isFirstConnect = false;
 }
}

// This section reads the pushbutton we defined at Virtual Pin 0
BLYNK_WRITE(V0)
{
 int state = param.asInt();
 if (state ==1)
 {
 TurnOn(); // If button is pushed, run the TurnOn code
 }
 else if (state ==0)
 {
 TurnOff();
 }
}

// This section reads the slider we defined at Virtual Pin 1 and assigns it to the variable brightness
BLYNK_WRITE(V1)
{
int pinValue = param.asInt(); // assigning incoming value from pin V1 to a variable
Serial.print("V1 Slider value is: ");
brightness = pinValue;
Serial.println(brightness); // Output brightness to the serial monitor
}


void loop() {
 Blynk.run(); // In general, when using Blynk, do not include any of the write or read functions in the void loop section. Your auth code will be disabled for flooding the connection
}

// This section is what happens when the Button is pushed
void TurnOn()
{
 Blynk.virtualWrite(V7, ON); // Blynk sends the pushed button state
 Serial.println("Button was pushed."); // We write it to the serial monitor
 showType++; // Increment the type of reaction to push button, used in the startShow function below
 Serial.println(showType); // Write the showtype to the serial monitor
 if (showType > 9) // If showType is greater than the nin possibilitie we define below then set it back to 0 and start over
 showType=0;
 startShow(showType); // Run the startShow function
}

void TurnOff()
{
 Blynk.virtualWrite(V7, OFF); // Blynk sends the pushed button state
 Serial.println("Button was released.");
 strip.show();

}

// This function performs the action based on the shoType variable - each button push adds one to the variable calling a different function
// If you call a NeoPixel effect that runs for a while, the button pushes will be ignored until that effect finishes
// I used the brightness variable from the slider to set the brightness of each color, a better solution is needed at some point
void startShow(int i) {
 switch(i){
 case 0: colorWipe(strip.Color(0, 0, 0), 50); // Black/off
 break;
 case 1: colorWipe(strip.Color(0, brightness, 0), 50); // RED
 break;
 case 2: colorWipe(strip.Color(brightness, 0, 0), 50); // GREEN
 break;
 case 3: colorWipe(strip.Color(0, 0, brightness), 50); // Blue
 break;
 case 4: colorWipe(strip.Color(0, 0, 0,brightness), 50); // White
 break;
 case 5: theaterChase(strip.Color(0, brightness, 0), 50); // Red
 break;
 case 6: theaterChase(strip.Color( 0, 0, brightness), 50); // Blue
 break;
 case 7: theaterChase(strip.Color(0, brightness, 0, brightness), 50); // Red & White
 break;
 case 8: theaterChase(strip.Color(brightness, 0, 0, brightness), 50); // Green & White
 break;
 case 9: theaterChase(strip.Color(0, 0, brightness, brightness), 50); // Blue & White
 break;
 }
}

// All of the code below was stolen from the NeoPixel examples to provide some variety
// If you want to swap out some of the effects in the startShow function you can use these examples below
// colorWipe(strip.Color(255,0,0,0), 50); // Green
// colorWipe(strip.Color(0,255,0,0), 50); // Red
// colorWipe(strip.Color(0,0,255,0), 50); // Blue
// theaterChase(strip.Color(255, 0, 0, 0), 50); // Green & White
// theaterChase(strip.Color(0, 255, 0, 0), 50); // Red & White
// theaterChase(strip.Color(0, 0, 255, 0), 50); // Blue & White
// rainbow(20);
// theaterChaseRainbow(50);
// meteorRain(0xff,0xff,0xff,10, 64, true, 30);
// Fire(55,120,15);
// RunningLights(0xff,0,0, 50); // red
// RunningLights(0xff,0xff,0xff, 50); // white
// RunningLights(0,0,0xff, 50); // blue
// SnowSparkle(0x10, 0x10, 0x10, 20, 200);
// TwinkleRandom(16, 10, false);
// colorWipe(strip.Color(0,0,0,255), 10); // White
// theaterChase(strip.Color(0, 0, 0, 255), 50); // White
// rainbowCycle(2000);

// Fill the dots one after the other with a color
void colorWipe(uint32_t c, uint8_t wait) {
 for(uint16_t i=0; i<strip.numPixels(); i++) {
 strip.setPixelColor(i, c);
 strip.show();
 delay(wait);
 }
}

void rainbow(uint8_t wait) {
 uint16_t i, j;

for(j=0; j<256; j++) {
 for(i=0; i<strip.numPixels(); i++) {
 strip.setPixelColor(i, Wheel((i+j) & 255));
 }
 strip.show();
 delay(wait);
 }
}

// Slightly different, this makes the rainbow equally distributed throughout
void rainbowCycle(uint8_t wait) {
 uint16_t i, j;

for(j=0; j<256*5; j++) { // 5 cycles of all colors on wheel
 for(i=0; i< strip.numPixels(); i++) {
 strip.setPixelColor(i, Wheel(((i * 256 / strip.numPixels()) + j) & 255));
 }
 strip.show();
 delay(wait);
 }
}

//Theatre-style crawling lights.
void theaterChase(uint32_t c, uint8_t wait) {
 for (int j=0; j<10; j++) { //do 10 cycles of chasing
 for (int q=0; q < 3; q++) {
 for (int i=0; i < strip.numPixels(); i=i+3) {
 strip.setPixelColor(i+q, c); //turn every third pixel on
 }
 strip.show();

delay(wait);

for (int i=0; i < strip.numPixels(); i=i+3) {
 strip.setPixelColor(i+q, 0); //turn every third pixel off
 }
 }
 }
}

//Theatre-style crawling lights with rainbow effect
void theaterChaseRainbow(uint8_t wait) {
 for (int j=0; j < 256; j++) { // cycle all 256 colors in the wheel
 for (int q=0; q < 3; q++) {
 for (int i=0; i < strip.numPixels(); i=i+3) {
 strip.setPixelColor(i+q, Wheel( (i+j) % 255)); //turn every third pixel on
 }
 strip.show();

delay(wait);

for (int i=0; i < strip.numPixels(); i=i+3) {
 strip.setPixelColor(i+q, 0); //turn every third pixel off
 }
 }
 }
}

// Input a value 0 to 255 to get a color value.
// The colours are a transition r - g - b - back to r.
uint32_t Wheel(byte WheelPos) {
 WheelPos = 255 - WheelPos;
 if(WheelPos < 85) {
 return strip.Color(255 - WheelPos * 3, 0, WheelPos * 3);
 }
 if(WheelPos < 170) {
 WheelPos -= 85;
 return strip.Color(0, WheelPos * 3, 255 - WheelPos * 3);
 }
 WheelPos -= 170;
 return strip.Color(WheelPos * 3, 255 - WheelPos * 3, 0);
}

// NEW

void showStrip() {
 #ifdef ADAFRUIT_NEOPIXEL_H
 // NeoPixel
 strip.show();
 #endif
 #ifndef ADAFRUIT_NEOPIXEL_H
 // FastLED
 FastLED.show();
 #endif
}

void setPixel(int Pixel, byte red, byte green, byte blue) {
 #ifdef ADAFRUIT_NEOPIXEL_H
 // NeoPixel
 strip.setPixelColor(Pixel, strip.Color(red, green, blue));
 #endif
 #ifndef ADAFRUIT_NEOPIXEL_H
 // FastLED
 leds[Pixel].r = red;
 leds[Pixel].g = green;
 leds[Pixel].b = blue;
 #endif
}

void setAll(byte red, byte green, byte blue) {
 for(int i = 0; i < NUM_LEDS; i++ ) {
 setPixel(i, red, green, blue);
 }
 showStrip();
}
void TwinkleRandom(int Count, int SpeedDelay, boolean OnlyOne) {

for (int i=0; i<Count; i++) {
 setPixel(random(16),random(0,255),random(0,255),random(0,255));
 showStrip();
 delay(SpeedDelay);
 if(OnlyOne) {
 setAll(0,0,0);
 }
 }

 delay(SpeedDelay);
}

void SnowSparkle(byte red, byte green, byte blue, int SparkleDelay, int SpeedDelay) {
 setAll(red,green,blue);

 int Pixel = random(NUM_LEDS);
 setPixel(Pixel,0xff,0xff,0xff);
 showStrip();
 delay(SparkleDelay);
 setPixel(Pixel,red,green,blue);
 showStrip();
 delay(SpeedDelay);
}

void RunningLights(byte red, byte green, byte blue, int WaveDelay) {
 int Position=0;

 for(int i=0; i<NUM_LEDS*2; i++)
 {
 Position++; // = 0; //Position + Rate;
 for(int i=0; i<NUM_LEDS; i++) {
 // sine wave, 3 offset waves make a rainbow!
 //float level = sin(i+Position) * 127 + 128;
 //setPixel(i,level,0,0);
 //float level = sin(i+Position) * 127 + 128;
 setPixel(i,((sin(i+Position) * 127 + 128)/255)*red,
 ((sin(i+Position) * 127 + 128)/255)*green,
 ((sin(i+Position) * 127 + 128)/255)*blue);
 }

 showStrip();
 delay(WaveDelay);
 }
}

void Fire(int Cooling, int Sparking, int SpeedDelay) {
 static byte heat[NUM_LEDS];
 int cooldown;

 // Step 1. Cool down every cell a little
 for( int i = 0; i < NUM_LEDS; i++) {
 cooldown = random(0, ((Cooling * 10) / NUM_LEDS) + 2);

 if(cooldown>heat[i]) {
 heat[i]=0;
 } else {
 heat[i]=heat[i]-cooldown;
 }
 }

 // Step 2. Heat from each cell drifts 'up' and diffuses a little
 for( int k= NUM_LEDS - 1; k >= 2; k--) {
 heat[k] = (heat[k - 1] + heat[k - 2] + heat[k - 2]) / 3;
 }

 // Step 3. Randomly ignite new 'sparks' near the bottom
 if( random(255) < Sparking ) {
 int y = random(7);
 heat[y] = heat[y] + random(160,255);
 //heat[y] = random(160,255);
 }

// Step 4. Convert heat to LED colors
 for( int j = 0; j < NUM_LEDS; j++) {
 setPixelHeatColor(j, heat[j] );
 }

showStrip();
 delay(SpeedDelay);
}

void setPixelHeatColor (int Pixel, byte temperature) {
 // Scale 'heat' down from 0-255 to 0-191
 byte t192 = round((temperature/255.0)*191);

 // calculate ramp up from
 byte heatramp = t192 & 0x3F; // 0..63
 heatramp <<= 2; // scale up to 0..252

 // figure out which third of the spectrum we're in:
 if( t192 > 0x80) { // hottest
 setPixel(Pixel, 255, 255, heatramp);
 } else if( t192 > 0x40 ) { // middle
 setPixel(Pixel, 255, heatramp, 0);
 } else { // coolest
 setPixel(Pixel, heatramp, 0, 0);
 }
}

void meteorRain(byte red, byte green, byte blue, byte meteorSize, byte meteorTrailDecay, boolean meteorRandomDecay, int SpeedDelay) {
 setAll(0,0,0);

 for(int i = 0; i < NUM_LEDS+NUM_LEDS; i++) {


 // fade brightness all LEDs one step
 for(int j=0; j<NUM_LEDS; j++) {
 if( (!meteorRandomDecay) || (random(10)>5) ) {
 fadeToBlack(j, meteorTrailDecay );
 }
 }

 // draw meteor
 for(int j = 0; j < meteorSize; j++) {
 if( ( i-j <NUM_LEDS) && (i-j>=0) ) {
 setPixel(i-j, red, green, blue);
 }
 }

 showStrip();
 delay(SpeedDelay);
 }
}

void fadeToBlack(int ledNo, byte fadeValue) {
 #ifdef ADAFRUIT_NEOPIXEL_H
 // NeoPixel
 uint32_t oldColor;
 uint8_t r, g, b;
 int value;

 oldColor = strip.getPixelColor(ledNo);
 r = (oldColor & 0x00ff0000UL) >> 16;
 g = (oldColor & 0x0000ff00UL) >> 8;
 b = (oldColor & 0x000000ffUL);

r=(r<=10)? 0 : (int) r-(r*fadeValue/256);
 g=(g<=10)? 0 : (int) g-(g*fadeValue/256);
 b=(b<=10)? 0 : (int) b-(b*fadeValue/256);

 strip.setPixelColor(ledNo, r,g,b);
 #endif
 #ifndef ADAFRUIT_NEOPIXEL_H
 // FastLED
 leds[ledNo].fadeToBlackBy( fadeValue );
 #endif
}
With any luck, the code should compile in the Arduino IDE. Usually compilation issues are related to libraries or boards definitions being wrong. Start there to look for issues. IF the code compiles, then plug the board into your computer and upload the code. Open the Serial Monitor in the IDE, Tools->Serial Monitor, and you should see the output from the code and more importantly the LEDs should light up. Once the serial monitor shows that a connection to the Blynk server is established, you can open the Blynk app on your phone and run your app to connect to your board by clicking on the upper right hand corner icon. When the app is running, you should see a screen similar to the following image.

The app will notify you if it cannot connect to the board.
Now you can work on designing an enclosure for the project. I created a simple case and mounting ring for the Jupiter Lithophane. To use the case and mounting ring, you will need to print the Jupiter Lithophane scaled to 140% on your 3D printer.
Parts:
Jupiter Lamp OpenScad Parts – Generate STLs from These FIles
I used M3 screws for the board mount inside the case and M2 screws for the case lid mounting.

Leave a Reply